
DIY Website Design Made Easy: How to Optimize Images for Squarespace Like a Pro

Why Optimize Your Website Images?
Image optimization, although not the most glamorous aspect of DIY websites, is incredibly vital for a handful of key reasons:
Website Speed: Oversized images can be a major roadblock for quick website load times, potentially leading to a less-than-ideal user experience. In today's fast-paced digital world, people tend to lose interest if they have to wait for images to load. Did you know that statistics indicate you have a mere half-second to capture a visitor's attention and make them decide whether to stay on your site or hit the exit button? Moreover, the speed at which your website loads can impact your SEO ranking on Google. Google values customer experience, and slow-loading websites don't make the cut.
SEO Boost: Optimizing image titles not only speeds up your website but also enhances your chances of ranking higher on Google. When Google can decipher what your images represent and their relevance within your content, it's more likely to give your website a boost in search results. It's all about making sense to search engines, which, in turn, makes sense for your brand.
How to optimize your images
Getting your website's images in tip-top shape isn't rocket science, so there's no need to break a sweat. In fact, once you've gotten the hang of it, it's as easy as pie, and these image optimization steps will soon become second nature in your web design and blogging routine. So, let's roll up our sleeves and walk through the process.
When you're designing a website or writing a blog post, you often need to use images to convey your message or enhance the visual appeal. However, using images straight from your camera or smartphone without optimization can slow down your site and harm your user experience. Think about it: who wants to wait forever for a webpage to load? You'll lose visitors quicker than you can say "optimization." Plus, Google doesn't fancy slow sites, which might hurt your SEO rankings.
But don't worry; we're here to guide you through the optimization process so you'll never lose sleep over image troubles again.
1. Compressing your images for the web
It's time to roll up our sleeves and dive into image optimization. This step offers a couple of pathways, and I'm here to guide you through two of the most popular ones: using an online tool and the handy Mac Preview App. The goal? We're aiming for "web-resolution" images, usually clocking in at 72 ppi (pixels per inch), but at a larger scale to keep everything crisp and undistorted on screens.
Here's a little tidbit for you: 300 dpi (dots per inch) might be the go-to for high-quality print projects, but it's overkill for the web. Why? It churns out huge image files that can slow down your web pages. And you know what they say, ain't nobody got time for slow-loading sites!
Let's break it down for different types of images. Banner images, those big, eye-catching ones, should ideally be around 2,000 pixels wide. For other images on your site, target a range between 1000-1500 pixels wide, depending on where you plan to use them. This sweet spot ensures your images look crisp without ballooning file sizes.
Now, about image types – JPG is your friend. They're smaller in size compared to PNG images, making them ideal for web optimization. And here's the kicker: you want to keep your images nice and lean, aiming for 500kb or smaller. This will ensure your website stays snappy and user-friendly. Time to optimize those visuals!
Here are the methods I use every day in my workflow:
Method 1: Online Image Compressor
One of my favorite toLet me introduce you to one of my all-time favorite image optimization tools: the trusty Online Image Compressor. It's a real game-changer! Here's how it works:
Upload your images: Start by uploading the images you want to use. Give it a moment to work its magic, and you'll see your images finish uploading and compressing.
Quality control: Scroll down a bit once your images are all set. You'll find a slider that lets you control the quality level. It's like your very own image-quality remote! Find your sweet spot, and then...
Click to compress: Hit that "Compress" button, and watch the magic happen. It's like watching the excess baggage drop off before a flight—except your images won't miss their luggage.
Once the compression is complete, you can download the optimized images one by one or grab them all in a neat zip file. It's like a tidy little package of speed-boosting goodness for your website.
Let's talk results: I uploaded an image weighing in at a hefty 691 kb in my test run. After the magic touch of compression, it slimmed down to a svelte 272 kb. And you know what's truly awesome? It didn't lose much quality in the process!
Here's another example: a screenshot file originally chunky at 1.1 MB. Post-compression, it got down to a sleek 271 kb. Talk about shedding the extra weight while keeping the quality intact!
Who doesn't love a nifty tool that works like a charm? Say hello to faster websites and happier visitors!

Method 2: Using the Preview App on Your Mac
Open your image in Preview.
Duplicate the image & name the copy something different.
To keep myself organized, I usually add “-web” before the file format suffix, so that I can quickly see which are my optimized images.
So my file name would look like, “ camera with magazine-web.jpg”
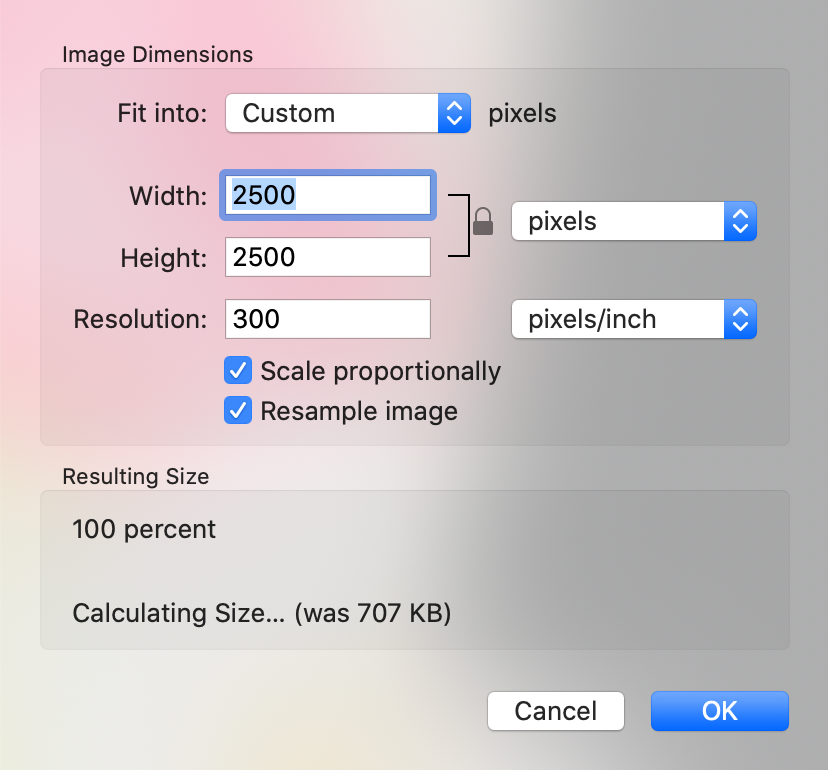
Select Tools from the Preview Menu - Select Adjust Size.
This pop-up window will appear with all kinds of things you can change, in order to make the file size smaller.

This pop-up window will appear with all kinds of things you can change in order to make the file size smaller.
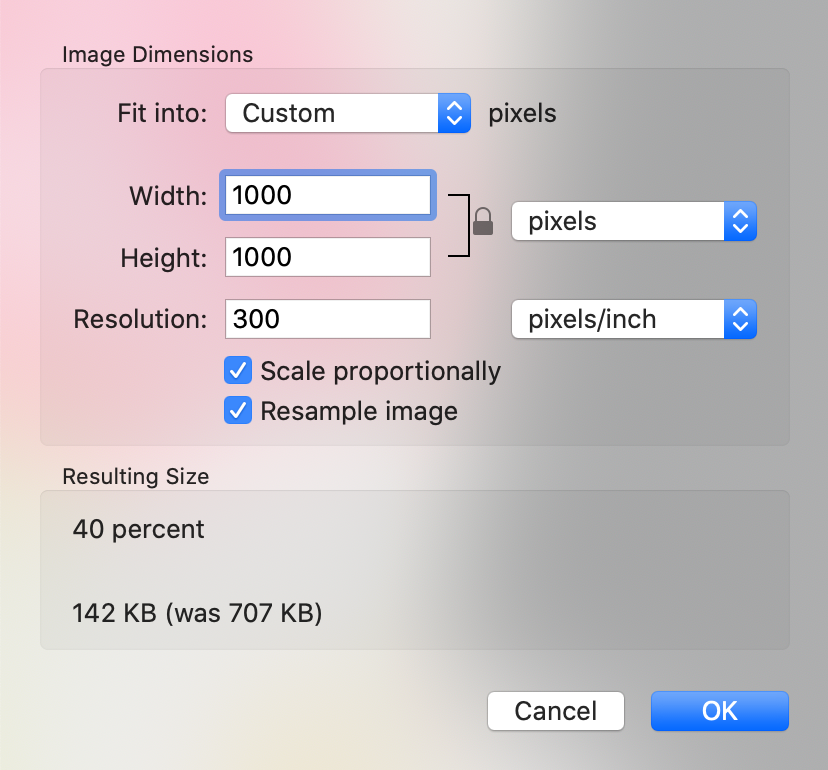
Adjust the numbers in the 'width' area until the'resulting size' is somewhere at 500 KB or less. You can also change the resolution to 72 ppi if you would like.
Make your changes and click “OK”.
Helpful Tip: If you don’t like your changes, press Command + Z on the keyboard or go to Edit < Undo to undo those changes and start over again until you get what you want.
Method 3: Jpg Export with Preview
If you don’t want to go through all that, you can do a simple export to jpg in the Preview App. This works great for if you have a png image that you want to convert to jpg.
When you have your image open in Preview, go to File < Export and select JPEG. Click & drag the slider (let go of the slider to preview the new file size number before saving) to control the file size you’re aiming for, then click Save. Voila!

2. Naming your images
Let's talk about image names and their sneaky importance for SEO. You see, search engines like Google have a bit of a challenge when it comes to images—they can't actually see them. So, what do they do? They scout around for the image name, hoping that it gives them a clue about what's hidden in the image itself.
Now, you might have a bunch of images sitting on your computer with rather unhelpful names like IMG_0986.jpg. Trust me, Google won't be impressed. So, here's how you can make the search engines love you more:
Step 1: Rename before you upload: Give them some meaningful names before you even think about uploading your images. Remember, that initial name is embedded on your site, even if you rename it later on your platform, like Squarespace. So, it's like giving Google multiple maps to find its way to your content treasure!
Step 2: Name them again in Squarespace. When you upload an image via the image block, Squarespace gives you a nifty space to name it. Use it! And here's the SEO secret sauce: try to name your image based on what's happening in it. If you can sneak in a keyword or two, that's even better!
Here's a handy tip: while it's great to include keywords, you should avoid repeatedly going overboard and stuffing your image name with the same words. Google has gotten pretty smart, and this tactic might actually hurt your ranking. So, just be as reasonable as a well-informed human being when naming your images.
So there you have it—two crucial things to keep in mind when uploading images to Squarespace: Compress and Rename. Once you get into the habit of doing this regularly, it becomes second nature, and your website will thank you!
3. What is alt text, and why is it important?
Alt text is a crucial aspect of web design that often goes overlooked, but it packs a punch when it comes to SEO and accessibility. In a nutshell, alt text provides an image description to assist search engines in understanding the content and make your website more accessible to individuals with disabilities. This simple yet powerful feature ensures that your site ranks better on search engines and, more importantly, provides a better user experience for all visitors.
Think of alt text as your image's voice. When search engines crawl your site, they can't "see" images the way we do. Alt text is like a brief narration that guides them through what's depicted. This is why crafting descriptive and relevant alt text for every image you use on your website is essential.
But here's the exciting part: alt text serves SEO and improves accessibility. Imagine someone with a visual impairment using a screen reader to browse your website. Alt text ensures that this user gets a comprehensive description of the images you've included, making your content accessible to a broader audience.
So, next time you upload an image to your site, take a moment to provide meaningful alt text. It's a small effort that brings significant benefits, enhancing both your SEO ranking and user experience.
4. How to add alt text in Squarespace
Squarespace simplifies the process of adding alt text to your images, making it a breeze to enhance your website's SEO and accessibility. Let's take a closer look at how you can easily implement this important step:
Image Uploading: You're presented with an intuitive interface when you upload an image to Squarespace. You'll notice an option to add "Description" to your image right there. This is where you'll input your alt text.
What to Include: Think of your alt text as a concise yet informative description of your image. Focus on the image's content and purpose. If it's a picture of a tropical beach at sunset, your alt text could be something like "A serene tropical beach at sunset with palm trees and calm waters." Be descriptive, but avoid unnecessary fluff.
Keywords and Relevance: Consider incorporating relevant keywords if they fit naturally into your alt text. However, avoid overloading it with keywords, as this can have a negative impact on your SEO.
Screen Reader-Friendly: When crafting your alt text, visualize how it would sound if read aloud by a screen reader. Keep it clear and straightforward, ensuring that someone with visual impairments can understand the image's content.
Decorative Images: If an image serves no informative purpose (e.g., a decorative separator or a purely aesthetic element), you can leave the alt text field blank or use double quotation marks ("") to indicate it's decorative.
Editing Existing Images: Squarespace makes it easy to add or edit alt text for images you've already uploaded. Simply access the image and modify the description in the settings.
Preview and Confirm: Before finalizing your content, consider how your alt text enhances the user experience and SEO. A good practice is to preview your website with a fresh perspective to ensure the alt text aligns with your image and website goals.
5. Optimizing thumbnail images
Optimizing thumbnail images is a crucial step in web design that often gets overlooked. Thumbnails are the small, compressed versions of larger images that users see before clicking to view the full image. These little visuals can greatly impact your website's performance, user experience, and SEO.
Start with the Right Dimensions: Consider the dimensions you need for your thumbnails. They should be consistent in size, creating a uniform and visually appealing look on your website. This consistency helps maintain a professional and organized appearance.
Compression is Key: Thumbnails should be lightweight, meaning their file size should be small. Compress your images to maintain a swift website loading speed.
File Naming: Just like with full-size images, ensure your thumbnails have meaningful file names.
Optimize Alt Text: Alt text isn't just for full-sized images. It's equally important for your thumbnails.
Consistency Matters: Consistency in your thumbnail layout and design contributes to a more polished website. Ensure that all your thumbnails follow a consistent style and arrangement to provide a cohesive visual experience.


